The first shot we used in our film is a long shot. We decided to use a long shot because we want the audience to get a full view of our characters so they know that they are young girls and that they are alone. This will make the girls seem vulnerable to the audience because they alone in what looks like a very deserted place.
The next shot we used is a long shot/establishing shot. The reason we decided to use this shot in our film because we want the audience to know exactly where they are. In the first shot, they are shown walking across a bridge as if they are on their way into the woods. So, to make the audience clear that the victims are in a woods we decided to use a long shot/establishing shot to make this clear to the audience. Also, because the shot has got no characters in it, it shows that the woods are completely deserted because there is no one around. This makes the victims look even more vulnerable because there is no one around and they are completely alone.
The next shot is another long shot. This shot is of the victims and they are walking away from the camera. We decided to use a long shot because we wanted to show the audience that they are walking through the deserted woods. Also, because the pathway looks like it doesn't have an end we want to show the audience that perhaps they are going very deep into the woods. This is effective because as it is a horror film, our audience probably expects something bad will happen, so if they see the victims walking deeper into the woods they will probably feel more tense as they will probably expect something bad to happen. This will then create a scarier atmosphere for our audience.
The next shot we use is a mid shot. We decided to use this shot because we wanted to see quite clearly the faces of our victims because when they stop to hear something the audience will want to see their facial expressions. We decided to use a mid shot rather than a close up shot because we felt it was necessary to see the body language of our victims rather than just a facial expression. We also wanted the audience to see the victims stop and the best way to do this was to use a mid shot because that way they would more or less be able to see their facial expressions but also they will be able to see the victims cautiously stop because they heard a noise. This will cause tension for the audience because they might think that something is going to happen so they may feel scared for the characters.
The next shot is another mid shot of the victims They are still in the same place in the woods as last time but this time we see them from the other side of them. We decided to do this because then we could show the victims turned around to show that they are looking in that direction because they think they heard something. This is effective because it means that the audience are able to see the victims from all angles and also it shows, again, how deserted the woods really are.
After we see a long shot of Georgia crouching down to tie up her lace we are shown a close up shot. This close up shot is of Georgia tying up her lace. There is no real reason why we decided to use this particular shot we just thought it would look quite effective if the audience could see her tying up her shoelaces rather than just hearing that her lace has come undone.
After the quick close up of her shoe we go back to a long shot of Georgia on the floor tying up her shoelaces. At this point they are looking for Georgia's scarf that appears to be lost. Abbie then suddenly points out that she sees Georgia's scarf. At this point we see a close up/over the shoulder shot of Georgia with her scarf hanging of a tree branch in the background. This is effective because not only can we see Georgia's facial expression but we can also see the scarf that had mysteriously vanished. This gives the audience a tense feeling because the position of the shot makes it look like the scarf is further up the path than them, but how is this possible?
The next shot we see is of a long shot showing Georgia reaching for her scarf and Abbie waiting on the pathway for her. We decided to use this shot because it shows just how far away the tree is from the pathway. This will leave the audience feeling suspicious because it seems very unlikely how the scarf would manage to get from the pathway all the way to the branch of the tree. This would them make them think that someone put it there on purpose which would therefore lead to them feeling tense and perhaps a bit scared to watch.
The next shot is another long shot. In this shot we see Abbie standing to the side then in the background a dark figure walks past. The figure is walking quite slowly which is effective because it will mean that the audience will get a clear view of the villain and because of the slow pace it means that it will be very hard for the audience to miss it. Also, because of the long shot it means we can see Abbie and the villain in the shot at the same time. This is effective because it shows the audience just how close the villain is to Abbie which will make the audience feel tense and scared for Abbie.
A mid shot/close up shot is then used to show Abbie looking into the distance as she thinks she just saw something out of the corner of her eye. We used a close up shot/mid shot so the audience could see her facial expression as being confused and a bit anxious. This will then let the audience know that Abbie has got a strange feeling that something is there. This then makes the audience feel even more scared for her because now Abbie is starting to wonder if something is following them.
We then used another long shot to follow the mid shot/close up of Abbie. The next shot shows the camera moving to the left and into the trees. The camera is acting as Abbie's eyes. This is effective because it lets the audience know exactly what Abbie can see at this moment in time and it also gives the audience a sense that they are there with Abbie because they can see what she can. As the camera is moving more to the left a figure is then spotted among the trees. The fact that the camera(Abbie's eyes) is moving through the empty trees and then all of a sudden there is a dark figure in the trees is very effective. It means that the audience now know that Abbie has seen the mysterious figure which could make them feel very tense because now they will assume something bad will happen now that Abbie has seen the villain.
The next shot is a mid shot. Abbie is looking into the distance with a worried and confused look on her face. She has obviously just seen the villain but by looking at her facial expression the audience can perhaps assume that she thinks she has imagined that something is there because she is just staring in shock. This can be explained when, one or two shots later, Georgia comes back and she finds Abbie still staring into the distance. When Georgia looks into the distance where Abbie is still staring, the villain would have obviously disappeared so when Georgia looks back at Abbie completely un-frightened Abbie stops acting so shocked and they carry on walking. This could perhaps make the audience think that Abbie is trying not to think about what she thinks she just saw. This could also make the audience feel a bit suspicious because if Abbie just saw a figure in the trees then why would she not question it?
The next shot is a mid shot of the trees. The camera is tracking the trees as if the camera is Abbie. This is an effective shot because it shows the audience that Abbie is having a second look to see if she can see anything because obviously she is frightened by what she thinks she saw. This could then give the audience a sense that Abbie is clearly just trying to pretend that she didn't see anything because she isn't questioning it.
We decided to use a long shot as the next shot. In this shot we see Georgia walking up into the bushes because she thinks she heard something. As she walks towards the camera, which is positioned in the trees, Abbie suspiciously continues walking in the background. As Georgia is the main person in this shot it may be hard for the audience to realise that Abbie has not stopped. However, despite this the next shot quickly makes the audience aware that Abbie has disappeared.
The next shot is a long shot of the pathway running through the woods. The camera is moving to the right so the audience are getting a view of the completely empty pathway, this happens again in a new shot but the camera shows the other end of the pathway from the left. As the camera is representing Georgia's eyes it shows the audience that Georgia cannot see Abbie anywhere which will make the audience feel tense because it seems very suspicious how Abbie has disappeared so quickly.
The final shot is of a close up side view of Georgia's face. This shot is effective because the audience can clearly see Georgia's facial expression as being really worried. Also it is effective because you can see Georgia breathing really heavily because she is extremely scared. This shot is repeated three times however each shot is slightly different. We did this because we can add in sound effects of a beating heart which will represent Georgia's heart which will put the audience even more on edge because they can hear Georgia's heart beating very fast which could show the audience just how scared she really is.
Thursday, 13 February 2014

Animatic Storyboard

This is page 1 of our animatic story board. It is very hard to see, however we have carefully planned out what we are going to be filming, shot types and how long the shot will last for. The first box shows the Warner brothers logo. We will be using this as our institution. The shot of this will last for 8 seconds. The next box is showing a screen of writing which says '13 years ago today a young girl went missing in these woods and hasn't been found since'. This shot will last for 7 seconds. While this is being shown there will be slow, sinister music playing in the background. After this, the next box illustrates two girls walking through the woods. We decided to use a long shot for this shot to show them in their surrounding which makes sure that the audience know exactly where they are. This shot will last 7 seconds. The box after this shows the back of the two girls. This is a mid, over the shoulder shot of the girls walking away from the camera. This lasts for 5 seconds.
So, on the first page of our animatic storyboard all that is being illustrated is the girls making their way through the woods.

Page 2 of our storyboard illustrates the girls beginning to hear things in the woods. The first box shows the girls walking and in the background a black figure is standing in the distance. This is shown through the use of a long shot. We decided to show this shot for around 10 seconds so the audience will fully be able to see the dark figure. The second box shows a close up of the girls. The have stopped walking as they think they have heard something. This shot will last around 7 seconds because we want to be able to get in enough dialogue to allow the audience to know whats happening. The third box shows a long shot of the pathway. The camera will act as if it is the girls eyes looking to see if anything is there. This shot will last for around 6 seconds. The fourth box shows another close up of the girls faces. They are still looking to see if anything is there but instead of looking from their point of view we are shown a close up of their faces to see their facial expressions. This shot will last for around 6 seconds. The fifth box illustrates a long shot with the girls walking away from the camera as they think they were just imagining they heard something. This shot will last for around 7 seconds.

Page 3 of our storyboard illustrates one of the girls disappearing. It also first introduces us to the villain. The first box shows a mid shot of the girls through the trees. The camera is the murderer at this point. This means we are seeing the scene from the murderers point of view. This shot will last for around 5 seconds. The second box shows a close up of one of the girls. She is looking directly into the camera because she thinks she can hear something. At this point the camera is not the murderer because the girls are not yet supposed to come across the murderer just yet. This shot will last for around 7 seconds. The third box shows a long shot of the girl looking into the trees, as she was in the box before, but instead of seeing her facial expression, we just see her whole body from behind. In the same box/scene she also turns around but then realises her friend is not there. This shot will last for around 7 seconds. The fourth box shows a high angle shot/birds eye view of the girl frantically looking for her friend as now she is very scared because she thinks she is completely alone. This shot will last for around 6 seconds. The fifth box illustrates a close up side view of the girl. In the background of this we see a dark figure walk past- the murderer. This shot will last for around 7 seconds.

Page four of our storyboard illustrates when the victim comes across the villain for the first time. Box one shows a close up of the girl. She is still looking for her friend but doesn't seem to be having any luck. In this shot we will be adding in a sound effect of a twig breaking. The twig breaking will signify the murderer moving toward the victim. The next box shows the girl slowly turn around. The shot will start off as an over-the-shoulder shot but then will turn into a close up of her face. This shot will last for around 5 seconds. The next box shows a long shot of what the audience expected to be the villain whereas in fact it is the girls friend. She is covered in blood and has been possessed. This clip will last for around 5 seconds. The next shot is a close up of the girls face. She lets out a terrifying scream. This shot will last for 4 seconds. The last shot we are shown is the image of the title flash up on the screen. There will be a blast of loud, sinister music to accompany the title 'The unexpected'.
We did not include any dialogue in our storyboard because at that point we were not completely certain on what dialogue we were going to have in our film. We knew what sound effects we wanted but we did not know what we should have our characters say. Due to the fact we did not include dialogue it meant that we had to make it up when we were filming because we did not have a definite script. At the time we thought this wouldn't be a problem but when it came to editing we realised it was a big problem. It was a problem because we made everything up so it didn't make sense. So, when it came to writing a script we were not able to do so. This meant we had to re-record our characters speaking and put them in over the top of the other speaking.
Wednesday, 12 February 2014
Problems we have encountered
We have encountered various different problems in the process of editing our film. The first problem we came across was the fact we didn't have a set script. This was a problem for us because it meant that we could not write up a script for our film as it wouldn't of made sense. Originally when we were filming we didn't think we would need a set script as we thought we could just make it up and just write the script afterwards. However, when it came to editing our film we realised that none of what the actors were saying linked together so the script would not make sense. To overcome this problem we decided to cut out all of the talking in our film so that we have no dialogue and then rerecord our actors speaking from a script that we would have produced. This therefore means that we will be able to have a script that makes sense and it will also mean that the dialogue in our film will make sense because it will all link together.
Another problem we have encountered is that our film was 42 seconds over 2 minutes. This was clearly a big problem because our film has to be 2 minutes. This means that we needed to cut out 42 seconds worth of filming time. Luckily we were able to cut out that 42 extra seconds by cutting out unnecessary scenes from our film. This therefore means that we will now be able to have our film lasting for 2 minutes.
Another problem we have encountered is that our film was 42 seconds over 2 minutes. This was clearly a big problem because our film has to be 2 minutes. This means that we needed to cut out 42 seconds worth of filming time. Luckily we were able to cut out that 42 extra seconds by cutting out unnecessary scenes from our film. This therefore means that we will now be able to have our film lasting for 2 minutes.
Tuesday, 11 February 2014
Codes and conventions in our film
In our film we adhere to some of the codes and conventions of the horror genre. However, we have not conformed to all of the possible codes and conventions.
Some of the codes and conventions we adhered to are the use of young/teenage characters. Our two main characters are teenagers which would portray them as even more weak in our film because they are young and will come across as very unaware of the situation about to unfold. Also we have conformed to the use of dark lighting. We originally filmed in the dark but we decided to re-film because it was too dark so we were unable to clearly see the characters. To deal with this problem we re-filmed in the light and decided to edit the film in a way that would make the lighting darker. This therefore means that we will be conforming to the convention of dark lighting in horror films. One of the main conventions of a horror film is a murder. We do not actually have our victim murdered in our film but we do introduce what might be a potential murderer. We decided not to have an actual murder scene because we wanted to leave our film on a cliff hanger and we believed that having a murder take place would not allow us to have the cliff hanger we wanted. Other associations with the horror genre are; an isolated location, dark lighting, murder, gore, scary music and villains and victims. We have conformed to most of these. We are using woods as the setting for our film. This is an isolated location as not many people walk through those woods so it seems as though the victims are isolated from the rest of the world. We are going to have non -diegetic music throughout our film. This music will be sinister which will put the audience on edge and also create more tension. We will also have victims and a villain in our film. There will be two female victims. This is also conforming to the usual convention of the victims being female in horror films. The villains gender will not be revealed as they will be dressed all in black with their face covered with a hood. This means we cannot conform to the convention of a male villain. We have not conformed to the use of gore and a murder. Originally there was gore included in our film but after cutting our film short we no longer have any scenes of gore. This leaves us with a dilemma. After doing our certificate research we realised that to make sure our film has an age rating of 15 we would need to include scenes of gore. However, now that we have cut out the gory scenes it means our film cannot be a 15. This doesn't necessarily mean that our film will not be scary, it just means that we have not included enough to make it a 15 which is the age rating most teenagers, who are our target audience, would consider the lowest age for a horror film rating.
Despite this, we have conformed to a variety of different codes and conventions. As we have done this it means that the genre of our film will be clearly identifiable and our target audience will hopefully enjoy watching our horror film because it has adhered to quite a few of the conventions shown in the most popular horror films.
Some of the codes and conventions we adhered to are the use of young/teenage characters. Our two main characters are teenagers which would portray them as even more weak in our film because they are young and will come across as very unaware of the situation about to unfold. Also we have conformed to the use of dark lighting. We originally filmed in the dark but we decided to re-film because it was too dark so we were unable to clearly see the characters. To deal with this problem we re-filmed in the light and decided to edit the film in a way that would make the lighting darker. This therefore means that we will be conforming to the convention of dark lighting in horror films. One of the main conventions of a horror film is a murder. We do not actually have our victim murdered in our film but we do introduce what might be a potential murderer. We decided not to have an actual murder scene because we wanted to leave our film on a cliff hanger and we believed that having a murder take place would not allow us to have the cliff hanger we wanted. Other associations with the horror genre are; an isolated location, dark lighting, murder, gore, scary music and villains and victims. We have conformed to most of these. We are using woods as the setting for our film. This is an isolated location as not many people walk through those woods so it seems as though the victims are isolated from the rest of the world. We are going to have non -diegetic music throughout our film. This music will be sinister which will put the audience on edge and also create more tension. We will also have victims and a villain in our film. There will be two female victims. This is also conforming to the usual convention of the victims being female in horror films. The villains gender will not be revealed as they will be dressed all in black with their face covered with a hood. This means we cannot conform to the convention of a male villain. We have not conformed to the use of gore and a murder. Originally there was gore included in our film but after cutting our film short we no longer have any scenes of gore. This leaves us with a dilemma. After doing our certificate research we realised that to make sure our film has an age rating of 15 we would need to include scenes of gore. However, now that we have cut out the gory scenes it means our film cannot be a 15. This doesn't necessarily mean that our film will not be scary, it just means that we have not included enough to make it a 15 which is the age rating most teenagers, who are our target audience, would consider the lowest age for a horror film rating.
Despite this, we have conformed to a variety of different codes and conventions. As we have done this it means that the genre of our film will be clearly identifiable and our target audience will hopefully enjoy watching our horror film because it has adhered to quite a few of the conventions shown in the most popular horror films.
Sunday, 9 February 2014
Font Research

As you can see, the font used for this horror film is simple and there is nothing which hugely suggests that it is the usual font used for horror films. The title is in block capitals and plain white. The white font is effective because of the black background. This makes it stand out more. On some of the letters in the titles, they have grey colours in them. As the huge chainsaw is directly above the title, and the chainsaw is the same grey that is in the letters, it could possibly provide a link meaning that when the see the chainsaw and the title the audience would automatically realise that the film is based on that chainsaw.
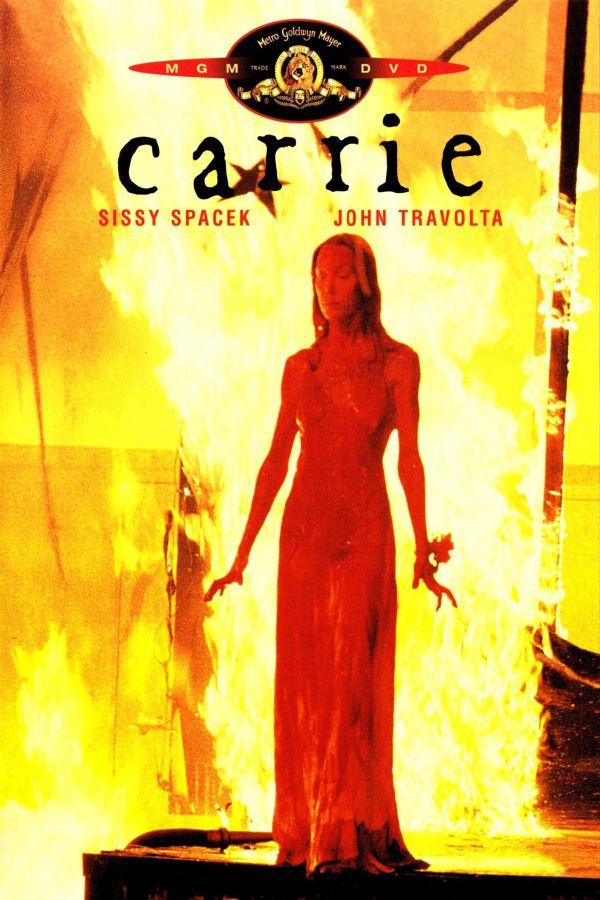
The font used in this film titles closely resembles hand writing. This is effective because it could show that a character from the film has written it which could emphasise the scariness of the film. Also there is no capital letters in the title so, again, it could suggest that it has been written by a character. The writing is black against a fiery red and yellow background. This is effective as it makes the title stand out. Also the colours used are red and yellow, both of which are colours that are related to horror films.

The font in this horror film title is quite plain, so there would be nothing to suggest that it is a definite horror film title if it wasn't for the images behind it. The writing is plain white against a black background which therefore makes the title stand out.
There is a trend with the three fonts I have analysed. Firstly, all of the fonts seem to be relatively plain- there is nothing that suggests they are specifically horror film titles. Secondly, the titles are either white or black against either a bright background or a plain black background to make them stand out. This helps me into my font research because now I know that horror film titles are mainly relatively plain and they are usually black or white against the opposite colour background.
Sound Online Tutorial
http://www.youtube.com/watch?v=a0IFprHpSaA
This sound online tutorial demonstrated to us how to get perfectly balanced audio throughout our film.
From watching this sound tutorial it has made us aware of the problems we will face when it comes to editing our film. The tutorial explains how to use various different sounds in one clip. For example, non-diegetic sounds, diegetic sounds and a narrator. In our film we will be including non- diegetic sounds and diegetic sounds, so this tutorial will help us a great deal when it comes to editing our film. The tutorial explains that when you use two different types of sounds in one clip, one sounds will overrule the other meaning that you will only be able to hear one of the sounds. For example in our film because we are including non -diegetic sounds and diegetic sounds it means that the audience may only be able to hear one of the sounds. This therefore means that our film will not be very good because we have not effectively edited our film to ensure the audio for our film has been perfectly balanced. However, after watching this tutorial we now know exactly what we need to do in order to balance our audio. The tutorial showed us exactly how to balance each of the different types of sounds we will be using to make sure the audience can hear each of the different sounds in proportion. It showed us how to increase or decrease the volume of each of the sounds. This is very helpful because in our film we will be using the non- diegetic sound of music which will play in the background and the diegetic music of our characters talking. We will need to balance both of these sounds to make sure one doesn't overrule the other. For example, the non- diegetic music is most likely to overrule the characters talking because it will be louder and so therefore the audience will not be able to clearly hear the characters talking so it means that perhaps our film will not be very effective to the audience because they will be trying to hear what the characters are saying but they won't be able to hear them.
So, after watching this tutorial on how to edit sounds we are now confident that we will be able to successfully edit our film on Premiere Elements 10 unlike before when we had no idea on how to edit sound. This therefore means that when it comes to editing our film we will be able to get on straight away and do it because we know exactly what we are doing so we won't have to experiment too much to try and work out how to do it because we already know how to do it.
This sound online tutorial demonstrated to us how to get perfectly balanced audio throughout our film.
From watching this sound tutorial it has made us aware of the problems we will face when it comes to editing our film. The tutorial explains how to use various different sounds in one clip. For example, non-diegetic sounds, diegetic sounds and a narrator. In our film we will be including non- diegetic sounds and diegetic sounds, so this tutorial will help us a great deal when it comes to editing our film. The tutorial explains that when you use two different types of sounds in one clip, one sounds will overrule the other meaning that you will only be able to hear one of the sounds. For example in our film because we are including non -diegetic sounds and diegetic sounds it means that the audience may only be able to hear one of the sounds. This therefore means that our film will not be very good because we have not effectively edited our film to ensure the audio for our film has been perfectly balanced. However, after watching this tutorial we now know exactly what we need to do in order to balance our audio. The tutorial showed us exactly how to balance each of the different types of sounds we will be using to make sure the audience can hear each of the different sounds in proportion. It showed us how to increase or decrease the volume of each of the sounds. This is very helpful because in our film we will be using the non- diegetic sound of music which will play in the background and the diegetic music of our characters talking. We will need to balance both of these sounds to make sure one doesn't overrule the other. For example, the non- diegetic music is most likely to overrule the characters talking because it will be louder and so therefore the audience will not be able to clearly hear the characters talking so it means that perhaps our film will not be very effective to the audience because they will be trying to hear what the characters are saying but they won't be able to hear them.
So, after watching this tutorial on how to edit sounds we are now confident that we will be able to successfully edit our film on Premiere Elements 10 unlike before when we had no idea on how to edit sound. This therefore means that when it comes to editing our film we will be able to get on straight away and do it because we know exactly what we are doing so we won't have to experiment too much to try and work out how to do it because we already know how to do it.
Practice Titles
THE UNEXPECTED (ESTRANGELO EDESSA)
THE UNEXPECTED
(BRADLEY HAND ITC)
THE UNEXPECTED (DFKai-
SB)
THE
UNEXPECTED (MONOTYPE CORSIVA)
THE UNEXPECTED (TUNGA)
THE
UNEXPECTED (JUICE ITC)
These are the different titles I created to see which font was best for our film. I created them in a word document and then transferred them to this post.
The first font I used was called Estrangelo Eddessa. This is not the best font to use because there is nothing that suggests that the film is going to be scary. This is because it is too simple and it gives nothing to show that it would be related to a horror film. This therefore means that we will not be using this font for our film title.
The second font I used , called Bradley Hand ITC, will be quite good to use because it has a scary look about it because the font actually resembles hand writing. This means that people might be more scared because it looks like someone has written it e.g. a murderer. So, this is a possible font we will use.
The next font, DFKai- SB, is also not really the right sort of font for our film. It is too simple which will not show our audience that the genre of our film is a horror. So, this is not the font we will be using.
Monotype was the next font I used. This is a good font because it is not simple. It looks like someone has written it which is the sort of thing we need for our font to match the genre of our film. However, despite the fact it looks like it has been hand written, it will not be suitable because it looks too happy as there are swirls at the end of each of the letters,which makes it look like it should be the font for a different genre film e.g. a romance.
The next font I used, Tunga, is also not really the right font for our film. It is too simple and it looks like it should be used for an action film or something that relates a lot to technology. This means that it will not go with our horror theme so it would not be suitable for our film.
The last font was Juice ITC. I think this is a good font to use because it is not simple and it will fit perfectly with our genre of horror. The letter in the title are different throughout it. For example, the letter 'T' is thick at the bottom but thin at the top whereas the letter 'E' is thin at the bottom and thick to the side of the letter. This shows that it could be related to a horror film because it is not simple and there is no consistency throughout the whole title. This could resemble the uncertainty the audience feel in horror films - the feeling of the unknowing.
Subscribe to:
Posts (Atom)